Home Recording Resources
Microphone
Audio-Reader recommends the Audio-Technica AT2005USBPK Vocal Microphone Pack for our home readers. This is a USB microphone that connects easily to any computer. It comes with monitoring headphones and a boom arm.
Audio Software
Audacity is a free, open source, audio recording program you can download HERE. It has all the functionality you need to record for Audio-Reader and works on Apple and PC computers. Our step-by-step instructions for setting up and recording from home are HERE.
Timing App
Have trouble completing your program in that 56-58 minute sweet spot? Many of our volunteers use the Hours & Minutes Calculator App on their iPhones to make it easy!
Instructions
Books are aired on the broadcast in serial, after the entire book has been recorded. Each recording is 56-58 minutes long and begins with a 2-3 sentence summary of the prior recording. Complete each recording at the end of a sentence or paragraph, it DOES NOT need to be the end of a chapter. If you would like to record a book from home, contact Nick Carswell at nickcarswell@ku.edu to select your book. Detailed instructions are below.
Keep an accurate record of what page each broadcast begins and ends with, and keep your summaries until the entire book is completed and checked—just in case we need you to re-record a broadcast.
- If you reach your final broadcast and don’t have enough book left to fill out the hour, please find filler material to bring your broadcast to at least 55 minutes. This can be anything from movie and book reviews to author interviews or excerpts from books by the same author or on the same topic.
- If the book contains offensive material (excessive profanity, explicit sexual scenes, graphic violence etc.) read it as written and let Nick (nickcarswell@ku.edu) know so we can play a disclaimer before each broadcast.
- Name each recording with the name of the book and the broadcast number. Ex: “CatInTheHat-Broadcast1”, “CatInTheHat-Broadcast2”
- Upload recordings to https://www.dropbox.com/request/8EAF9X1ZILQxa0DnMB5w.
OPEN
“Hello, this is _____ with broadcast number _____ of the book ______ by ________.”
- For your first broadcast read information from the book jacket or front cover (reviews, descriptions, etc.) after your open. This introduces the listeners to the book and gives them a general idea of the topic or story that will be conveyed. After your open and book jacket, begin your book.
- If this is your second, or subsequent broadcast, please give a very brief synopsis (2-3 sentences) of your previous broadcast after your opening statement. This establishes context for your reading and highlight any important events that transpired in the previous broadcast. After reading your summary, begin where you left off.
CLOSE
“That’s all the time we have to read on today’s broadcast. We have been reading together _______ by _____. Remember, you can hear this and other Audio-Reader programs on the web at reader.ku.edu/archive. My name is ________. Thanks for joining me.”
Audio-Reader uses files in the following format:
- 16000Hz sample rate
- 16 bit rate
- Mono
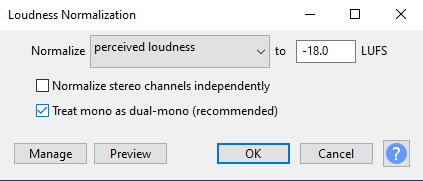
- Loudness normalized to -18 LUFS
There’s a couple of places to check or change these formats in Audacity.
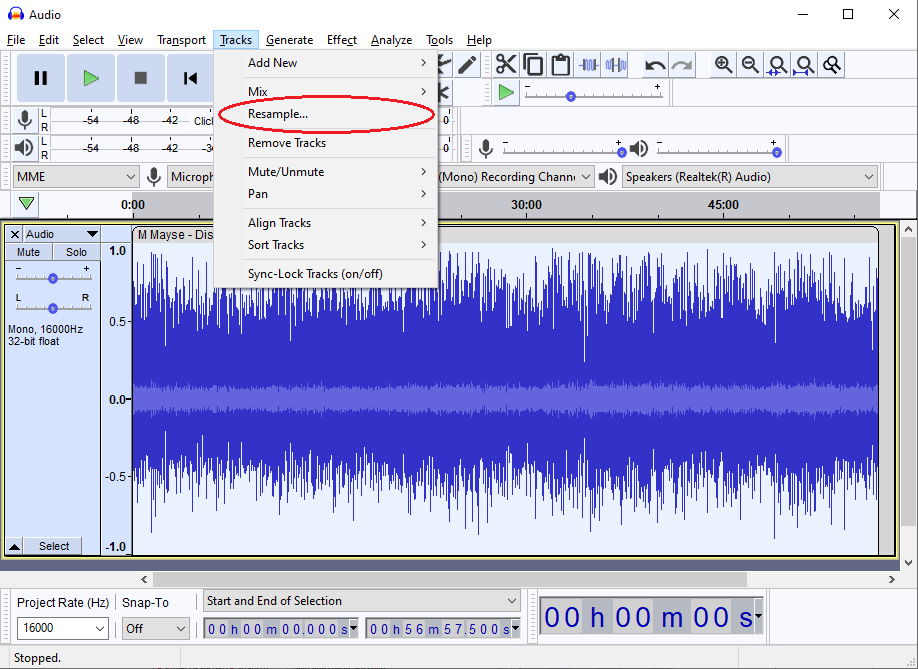
1. Sample Rate
The sample rate is determined by the Audacity Project Rate (Hz) setting in the bottom left corner. To set this correctly, simply select 16000 from the dropdown list (#1 below)
You can also view the sample rate for your recorded file in the track control panel (#2 below)

If you are working with a file recorded at a different sample rate, you can also select Tracks > Resample to convert the file to 16000Hz.
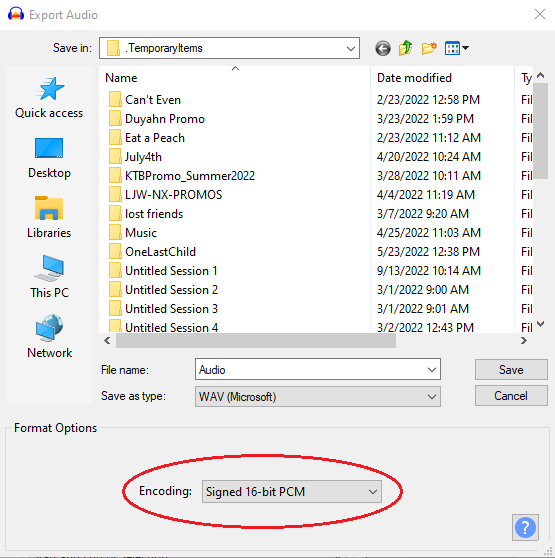
2. Bit Rate
In Audacity, bit rate is determined on File Export:
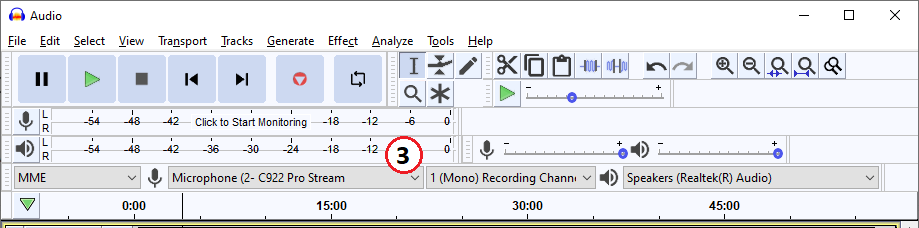
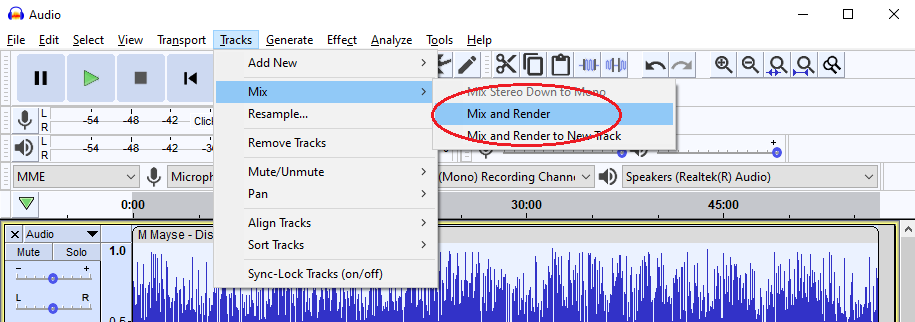
3. Mono
There are multiple ways to ensure a recording is in mono. The first way is to ensure the recording input is set to 1 (Mono) in the device toolbar (#3 below).
Additionally, you can convert a stereo recording to mono by selecting Track > Mix > Mix and Render
4. Loudness
As well as several ways to ensure you are recording at a good level “on the way in” by adjusting settings with your microphone and input level on the Device Toolbar, you can also fix audio recording level after recording, by selecting Effect > Loudness Normalization and setting the “perceived loudness” to -18LUFS (see below)